# 15.6 APP入口及主页
本节来介绍一下APP入口及首页。
# 15.6.1 APP入口
main函数为APP入口函数,实现如下:
void main() => Global.init().then((e) => runApp(MyApp()));
初始化完成后才会加载UI(MyApp),MyApp 是应用的入口Widget,实现如下:
class MyApp extends StatelessWidget {
Widget build(BuildContext context) {
return MultiProvider(
providers: [
ChangeNotifierProvider(create: (_) => ThemeModel()),
ChangeNotifierProvider(create: (_) => UserModel()),
ChangeNotifierProvider(create: (_) => LocaleModel()),
],
child: Consumer2<ThemeModel, LocaleModel>(
builder: (BuildContext context, themeModel, localeModel, child) {
return MaterialApp(
theme: ThemeData(
primarySwatch: themeModel.theme,
),
onGenerateTitle: (context){
return GmLocalizations.of(context).title;
},
home: HomeRoute(),
locale: localeModel.getLocale(),
//我们只支持美国英语和中文简体
supportedLocales: [
const Locale('en', 'US'), // 美国英语
const Locale('zh', 'CN'), // 中文简体
//其他Locales
],
localizationsDelegates: [
// 本地化的代理类
GlobalMaterialLocalizations.delegate,
GlobalWidgetsLocalizations.delegate,
GmLocalizationsDelegate()
],
localeResolutionCallback: (_locale, supportedLocales) {
if (localeModel.getLocale() != null) {
//如果已经选定语言,则不跟随系统
return localeModel.getLocale();
} else {
//跟随系统
Locale locale;
if (supportedLocales.contains(_locale)) {
locale= _locale!;
} else {
//如果系统语言不是中文简体或美国英语,则默认使用美国英语
locale= Locale('en', 'US');
}
return locale;
}
},
// 注册路由表
routes: <String, WidgetBuilder>{
"login": (context) => LoginRoute(),
"themes": (context) => ThemeChangeRoute(),
"language": (context) => LanguageRoute(),
},
);
},
),
);
}
}
2
3
4
5
6
7
8
9
10
11
12
13
14
15
16
17
18
19
20
21
22
23
24
25
26
27
28
29
30
31
32
33
34
35
36
37
38
39
40
41
42
43
44
45
46
47
48
49
50
51
52
53
54
55
56
57
58
59
60
在上面的代码中:
- 我们的根widget是
MultiProvider,它将主题、用户、语言三种状态绑定到了应用的根上,如此一来,任何路由中都可以通过Provider.of()来获取这些状态,也就是说这三种状态是全局共享的! HomeRoute是应用的主页。- 在构建
MaterialApp时,我们配置了APP支持的语言列表,以及监听了系统语言改变事件;另外MaterialApp消费(依赖)了ThemeModel和LocaleModel,所以当APP主题或语言改变时MaterialApp会重新构建 - 我们注册了命名路由表,以便在APP中可以直接通过路由名跳转。
- 为了支持多语言(本APP中我们支持美国英语和中文简体两种语言)我们实现了一个
GmLocalizationsDelegate,子Widget中都可以通过GmLocalizations来动态获取APP当前语言对应的文案。关于GmLocalizationsDelegate和GmLocalizations的实现方式读者可以参考“国际化”一章中的介绍,此处不再赘述。
# 15.6.2 主页
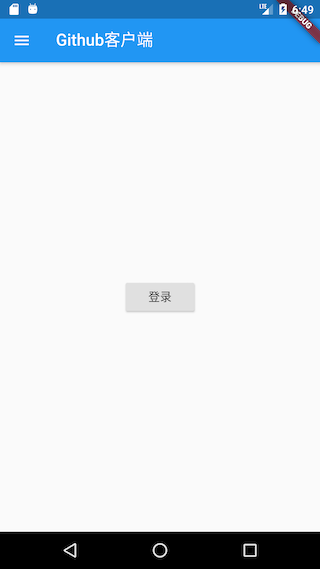
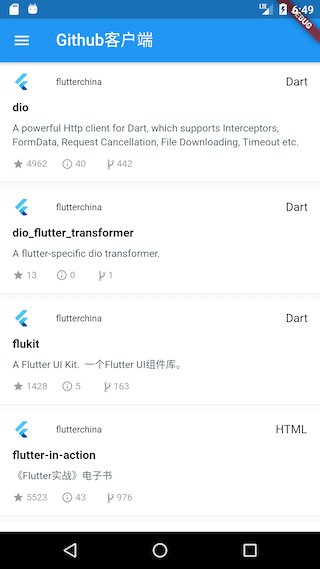
为了简单起见,当APP启动后,如果之前已登录了APP,则显示该用户项目列表;如果之前未登录,则显示一个登录按钮,点击后跳转到登录页。另外,我们实现一个抽屉菜单,里面包含当前用户头像及APP的菜单。下面我们先看看要实现的效果,如图15-1、15-2所示:


我们在“lib/routes”下创建一个“home_page.dart”文件,实现如下:
class HomeRoute extends StatefulWidget {
_HomeRouteState createState() => _HomeRouteState();
}
class _HomeRouteState extends State<HomeRoute> {
static const loadingTag = "##loading##"; //表尾标记
var _items = <Repo>[Repo()..name = loadingTag];
bool hasMore = true; //是否还有数据
int page = 1; //当前请求的是第几页
Widget build(BuildContext context) {
return Scaffold(
appBar: AppBar(
title: Text(GmLocalizations.of(context).home),
),
body: _buildBody(), // 构建主页面
drawer: MyDrawer(), //抽屉菜单
);
}
...// 省略
}
2
3
4
5
6
7
8
9
10
11
12
13
14
15
16
17
18
19
20
21
22
23
上面代码中,主页的标题(title)我们是通过GmLocalizations.of(context).home来获得,GmLocalizations是我们提供的一个Localizations类,用于支持多语言,因此当APP语言改变时,凡是使用GmLocalizations动态获取的文案都会是相应语言的文案,这在前面“国际化”一章中已经介绍过,读者可以前翻查阅。
我们通过 _buildBody()方法来构建主页内容,_buildBody()方法实现代码如下:
  Widget _buildBody() {
    UserModel userModel = Provider.of<UserModel>(context);
    if (!userModel.isLogin) {
      //用户未登录,显示登录按钮
      return Center(
        child: ElevatedButton(
          child: Text(GmLocalizations.of(context).login),
          onPressed: () => Navigator.of(context).pushNamed("login"),
        ),
      );
    } else {
      //已登录,则显示项目列表
      return ListView.separated(
        itemCount: _items.length,
        itemBuilder: (context, index) {
          //如果到了表尾
          if (_items[index].name == loadingTag) {
            //不足100条,继续获取数据
            if (hasMore) {
              //获取数据
              _retrieveData();
              //加载时显示loading
              return Container(
                padding: const EdgeInsets.all(16.0),
                alignment: Alignment.center,
                child: SizedBox(
                  width: 24.0,
                  height: 24.0,
                  child: CircularProgressIndicator(strokeWidth: 2.0),
                ),
              );
            } else {
              //已经加载了100条数据,不再获取数据。
              return Container(
                alignment: Alignment.center,
                padding: EdgeInsets.all(16.0),
                child: Text(
                  "没有更多了",
                  style: TextStyle(color: Colors.grey),
                ),
              );
            }
          }
          //显示单词列表项
          return RepoItem(_items[index]);
        },
        separatorBuilder: (context, index) => Divider(height: .0),
      );
    }
  }
2
3
4
5
6
7
8
9
10
11
12
13
14
15
16
17
18
19
20
21
22
23
24
25
26
27
28
29
30
31
32
33
34
35
36
37
38
39
40
41
42
43
44
45
46
47
48
49
50
上面代码注释很清楚:如果用户未登录,显示登录按钮;如果用户已登录,则展示项目列表。
_retrieveData() 方法用于获取项目列表,具体逻辑是:每次请求获取20条,当获取成功时,先判断是否还有数据(根据本次请求的项目条数是否等于期望的20条来判断还有没有更多的数据),然后将新获取的数据添加到_items中,然后更新状态,具体代码如下:
//请求数据
void _retrieveData() async {
  var data = await Git(context).getRepos(
    queryParameters: {
      'page': page,
      'page_size': 20,
    },
  );
  //如果返回的数据小于指定的条数,则表示没有更多数据,反之则否
  hasMore = data.length > 0 && data.length % 20 == 0;
  //把请求到的新数据添加到items中
  setState(() {
    _items.insertAll(_items.length - 1, data);
    page++;
  });
}
2
3
4
5
6
7
8
9
10
11
12
13
14
15
16
在此需要注意,Git(context).getRepos(…)方法中需要refresh参数来判断是否使用缓存。
itemBuilder为列表项的构建器(builder),我们需要在该回调中构建每一个列表项Widget。由于列表项构建逻辑较复杂,我们单独封装一个RepoItem Widget 专门用于构建列表项UI。RepoItem 实现如下:
import '../index.dart';
class RepoItem extends StatefulWidget {
// 将`repo.id`作为RepoItem的默认key
RepoItem(this.repo) : super(key: ValueKey(repo.id));
final Repo repo;
_RepoItemState createState() => _RepoItemState();
}
class _RepoItemState extends State<RepoItem> {
Widget build(BuildContext context) {
var subtitle;
return Padding(
padding: const EdgeInsets.only(top: 8.0),
child: Material(
color: Colors.white,
shape: BorderDirectional(
bottom: BorderSide(
color: Theme.of(context).dividerColor,
width: .5,
),
),
child: Padding(
padding: const EdgeInsets.only(top: 0.0, bottom: 16),
child: Column(
crossAxisAlignment: CrossAxisAlignment.start,
children: <Widget>[
ListTile(
dense: true,
leading: gmAvatar(
//项目owner头像
widget.repo.owner.avatar_url,
width: 24.0,
borderRadius: BorderRadius.circular(12),
),
title: Text(
widget.repo.owner.login,
textScaleFactor: .9,
),
subtitle: subtitle,
trailing: Text(widget.repo.language??'--'),
),
// 构建项目标题和简介
Padding(
padding: const EdgeInsets.symmetric(horizontal: 16.0),
child: Column(
crossAxisAlignment: CrossAxisAlignment.start,
children: <Widget>[
Text(
widget.repo.fork
? widget.repo.full_name
: widget.repo.name,
style: TextStyle(
fontSize: 15,
fontWeight: FontWeight.bold,
fontStyle: widget.repo.fork
? FontStyle.italic
: FontStyle.normal,
),
),
Padding(
padding: const EdgeInsets.only(top: 8, bottom: 12),
child: widget.repo.description == null
? Text(
GmLocalizations.of(context).noDescription,
style: TextStyle(
fontStyle: FontStyle.italic,
color: Colors.grey[700]),
)
: Text(
widget.repo.description!,
maxLines: 3,
style: TextStyle(
height: 1.15,
color: Colors.blueGrey[700],
fontSize: 13,
),
),
),
],
),
),
// 构建卡片底部信息
_buildBottom()
],
),
),
),
);
}
// 构建卡片底部信息
Widget _buildBottom() {
const paddingWidth = 10;
return IconTheme(
data: IconThemeData(
color: Colors.grey,
size: 15,
),
child: DefaultTextStyle(
style: TextStyle(color: Colors.grey, fontSize: 12),
child: Padding(
padding: const EdgeInsets.symmetric(horizontal: 16),
child: Builder(builder: (context) {
var children = <Widget>[
Icon(Icons.star),
Text(" " +
widget.repo.stargazers_count
.toString()
.padRight(paddingWidth)),
Icon(Icons.info_outline),
Text(" " +
widget.repo.open_issues_count
.toString()
.padRight(paddingWidth)),
Icon(MyIcons.fork), //我们的自定义图标
Text(widget.repo.forks_count.toString().padRight(paddingWidth)),
];
if (widget.repo.fork) {
children.add(Text("Forked".padRight(paddingWidth)));
}
if (widget.repo.private == true) {
children.addAll(<Widget>[
Icon(Icons.lock),
Text(" private".padRight(paddingWidth))
]);
}
return Row(children: children);
}),
),
),
);
}
}
2
3
4
5
6
7
8
9
10
11
12
13
14
15
16
17
18
19
20
21
22
23
24
25
26
27
28
29
30
31
32
33
34
35
36
37
38
39
40
41
42
43
44
45
46
47
48
49
50
51
52
53
54
55
56
57
58
59
60
61
62
63
64
65
66
67
68
69
70
71
72
73
74
75
76
77
78
79
80
81
82
83
84
85
86
87
88
89
90
91
92
93
94
95
96
97
98
99
100
101
102
103
104
105
106
107
108
109
110
111
112
113
114
115
116
117
118
119
120
121
122
123
124
125
126
127
128
129
130
131
132
133
134
135
136
137
138
139
140
141
142
上面代码有两点需要注意:
在构建项目拥有者头像时调用了
gmAvatar(…)方法,该方法是是一个全局工具函数,专门用于获取头像图片,实现如下:Widget gmAvatar(String url, { double width = 30, double? height, BoxFit? fit, BorderRadius? borderRadius, }) { var placeholder = Image.asset( "imgs/avatar-default.png", //头像占位图 width: width, height: height ); return ClipRRect( borderRadius: borderRadius ?? BorderRadius.circular(2), child: CachedNetworkImage( imageUrl: url, width: width, height: height, fit: fit, placeholder: (context, url) =>placeholder, errorWidget: (context, url, error) =>placeholder, ), ); }1
2
3
4
5
6
7
8
9
10
11
12
13
14
15
16
17
18
19
20
21
22
23代码中调用了
CachedNetworkImage是cached_network_image包中提供的一个Widget,它不仅可以在图片加载过程中指定一个占位图,而且还可以对网络请求的图片进行缓存,更多详情读者可以自行查阅其文档。由于Flutter 的Material 图标库中没有fork图标,所以我们在iconfont.cn上找了一个fork图标,然后根据“3.3 图片及Icon”一节中介绍的使用自定义字体图标的方法集成到了我们的项目中。
# 15.6.3 抽屉菜单
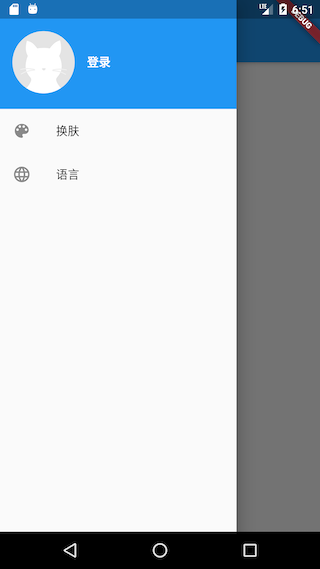
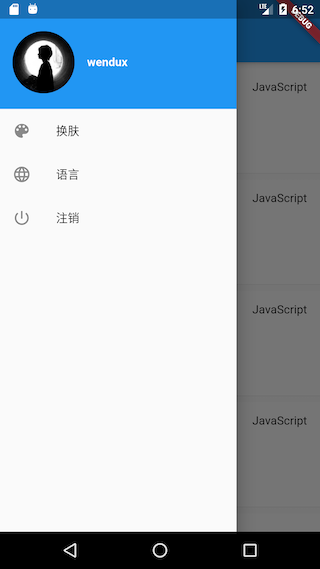
抽屉菜单分为两部分:顶部头像和底部功能菜单项。当用户未登录,则抽屉菜单顶部会显示一个默认的灰色占位图,若用户已登录,则会显示用户的头像。抽屉菜单底部有“换肤”和“语言”两个固定菜单,若用户已登录,则会多一个“注销”菜单。用户点击“换肤”和“语言”两个菜单项,会进入相应的设置页面。我们的抽屉菜单效果如图15-3、15-4所示:


实现代码如下:
class MyDrawer extends StatelessWidget {
const MyDrawer({
Key? key,
}) : super(key: key);
Widget build(BuildContext context) {
return Drawer(
child: MediaQuery.removePadding(
context: context,
// 移除顶部 padding.
removeTop: true,
child: Column(
crossAxisAlignment: CrossAxisAlignment.start,
children: <Widget>[
_buildHeader(), //构建抽屉菜单头部
Expanded(child: _buildMenus()), //构建功能菜单
],
),
),
);
}
Widget _buildHeader() {
return Consumer<UserModel>(
builder: (BuildContext context, UserModel value, Widget? child) {
return GestureDetector(
child: Container(
color: Theme.of(context).primaryColor,
padding: EdgeInsets.only(top: 40, bottom: 20),
child: Row(
children: <Widget>[
Padding(
padding: const EdgeInsets.symmetric(horizontal: 16.0),
child: ClipOval(
// 如果已登录,则显示用户头像;若未登录,则显示默认头像
child: value.isLogin
? gmAvatar(value.user!.avatar_url, width: 80)
: Image.asset(
"imgs/avatar-default.png",
width: 80,
),
),
),
Text(
value.isLogin
? value.user!.login
: GmLocalizations.of(context).login,
style: TextStyle(
fontWeight: FontWeight.bold,
color: Colors.white,
),
)
],
),
),
onTap: () {
if (!value.isLogin) Navigator.of(context).pushNamed("login");
},
);
},
);
}
// 构建菜单项
Widget _buildMenus() {
return Consumer<UserModel>(
builder: (BuildContext context, UserModel userModel, Widget? child) {
var gm = GmLocalizations.of(context);
return ListView(
children: <Widget>[
ListTile(
leading: const Icon(Icons.color_lens),
title: Text(gm.theme),
onTap: () => Navigator.pushNamed(context, "themes"),
),
ListTile(
leading: const Icon(Icons.language),
title: Text(gm.language),
onTap: () => Navigator.pushNamed(context, "language"),
),
if (userModel.isLogin)
ListTile(
leading: const Icon(Icons.power_settings_new),
title: Text(gm.logout),
onTap: () {
showDialog(
context: context,
builder: (ctx) {
//退出账号前先弹二次确认窗
return AlertDialog(
content: Text(gm.logoutTip),
actions: <Widget>[
TextButton(
child: Text(gm.cancel),
onPressed: () => Navigator.pop(context),
),
TextButton(
child: Text(gm.yes),
onPressed: () {
//该赋值语句会触发MaterialApp rebuild
userModel.user = null;
Navigator.pop(context);
},
),
],
);
},
);
},
),
],
);
},
);
}
}
2
3
4
5
6
7
8
9
10
11
12
13
14
15
16
17
18
19
20
21
22
23
24
25
26
27
28
29
30
31
32
33
34
35
36
37
38
39
40
41
42
43
44
45
46
47
48
49
50
51
52
53
54
55
56
57
58
59
60
61
62
63
64
65
66
67
68
69
70
71
72
73
74
75
76
77
78
79
80
81
82
83
84
85
86
87
88
89
90
91
92
93
94
95
96
97
98
99
100
101
102
103
104
105
106
107
108
109
110
111
112
113
114
115
116
117
用户点击“注销”,userModel.user 会被置空,此时所有依赖userModel的组件都会被rebuild,如主页会恢复成未登录的状态。
本小节我们介绍了APP入口MaterialApp的一些配置,然后实现了APP的首页。后面我们将展示登录页、换肤页、语言切换页。
← 15.5 网络请求封装 15.7 登录页 →

