# 9.7 动画过渡组件
为了表述方便,本书约定,将在Widget属性发生变化时会执行过渡动画的组件统称为”动画过渡组件“,而动画过渡组件最明显的一个特征就是它会在内部自管理AnimationController。我们知道,为了方便使用者可以自定义动画的曲线、执行时长、方向等,在前面介绍过的动画封装方法中,通常都需要使用者自己提供一个AnimationController对象来自定义这些属性值。但是,如此一来,使用者就必须得手动管理AnimationController,这又会增加使用的复杂性。因此,如果也能将AnimationController进行封装,则会大大提高动画组件的易用性。
# 9.7.1 自定义动画过渡组件
我们要实现一个AnimatedDecoratedBox,它可以在decoration属性发生变化时,从旧状态变成新状态的过程可以执行一个过渡动画。根据前面所学的知识,我们实现了一个AnimatedDecoratedBox1组件:
class AnimatedDecoratedBox1 extends StatefulWidget {
const AnimatedDecoratedBox1({
Key? key,
required this.decoration,
required this.child,
this.curve = Curves.linear,
required this.duration,
this.reverseDuration,
}) : super(key: key);
final BoxDecoration decoration;
final Widget child;
final Duration duration;
final Curve curve;
final Duration? reverseDuration;
_AnimatedDecoratedBox1State createState() => _AnimatedDecoratedBox1State();
}
class _AnimatedDecoratedBox1State extends State<AnimatedDecoratedBox1>
with SingleTickerProviderStateMixin {
AnimationController get controller => _controller;
late AnimationController _controller;
Animation<double> get animation => _animation;
late Animation<double> _animation;
late DecorationTween _tween;
Widget build(BuildContext context) {
return AnimatedBuilder(
animation: _animation,
builder: (context, child) {
return DecoratedBox(
decoration: _tween.animate(_animation).value,
child: child,
);
},
child: widget.child,
);
}
void initState() {
super.initState();
_controller = AnimationController(
duration: widget.duration,
reverseDuration: widget.reverseDuration,
vsync: this,
);
_tween = DecorationTween(begin: widget.decoration);
_updateCurve();
}
void _updateCurve() {
_animation = CurvedAnimation(parent: _controller, curve: widget.curve);
}
void didUpdateWidget(AnimatedDecoratedBox1 oldWidget) {
super.didUpdateWidget(oldWidget);
if (widget.curve != oldWidget.curve) _updateCurve();
_controller.duration = widget.duration;
_controller.reverseDuration = widget.reverseDuration;
//正在执行过渡动画
if (widget.decoration != (_tween.end ?? _tween.begin)) {
_tween
..begin = _tween.evaluate(_animation)
..end = widget.decoration;
_controller
..value = 0.0
..forward();
}
}
void dispose() {
_controller.dispose();
super.dispose();
}
}
2
3
4
5
6
7
8
9
10
11
12
13
14
15
16
17
18
19
20
21
22
23
24
25
26
27
28
29
30
31
32
33
34
35
36
37
38
39
40
41
42
43
44
45
46
47
48
49
50
51
52
53
54
55
56
57
58
59
60
61
62
63
64
65
66
67
68
69
70
71
72
73
74
75
76
77
78
79
80
81
82
83
84
85
下面我们来使用AnimatedDecoratedBox1来实现按钮点击后背景色从蓝色过渡到红色的效果:
Color _decorationColor = Colors.blue;
var duration = Duration(seconds: 1);
...//省略无关代码
AnimatedDecoratedBox1(
  duration: duration,
  decoration: BoxDecoration(color: _decorationColor),
  child: TextButton(
    onPressed: () {
      setState(() {
        _decorationColor = Colors.red;
      });
    },
    child: const Text(
      "AnimatedDecoratedBox",
      style: TextStyle(color: Colors.white),
    ),
  ),
)
2
3
4
5
6
7
8
9
10
11
12
13
14
15
16
17
18
点击前效果如图9-7所示,点击后截取了过渡过程的一帧如图9-8所示: 

点击后,按钮背景色会从蓝色向红色过渡,图9-9是过渡过程中的一帧,有点偏紫色,整个过渡动画结束后背景会变为红色。
上面的代码虽然实现了我们期望的功能,但是代码却比较复杂。稍加思考后,我们就可以发现,AnimationController的管理以及Tween更新部分的代码都是可以抽象出来的,如果我们这些通用逻辑封装成基类,那么要实现动画过渡组件只需要继承这些基类,然后定制自身不同的代码(比如动画每一帧的构建方法)即可,这样将会简化代码。
为了方便开发者来实现动画过渡组件的封装,Flutter提供了一个ImplicitlyAnimatedWidget抽象类,它继承自StatefulWidget,同时提供了一个对应的ImplicitlyAnimatedWidgetState类,AnimationController的管理就在ImplicitlyAnimatedWidgetState类中。开发者如果要封装动画,只需要分别继承ImplicitlyAnimatedWidget和ImplicitlyAnimatedWidgetState类即可,下面我们演示一下具体如何实现。
我们需要分两步实现:
继承
ImplicitlyAnimatedWidget类。class AnimatedDecoratedBox extends ImplicitlyAnimatedWidget { const AnimatedDecoratedBox({ Key? key, required this.decoration, required this.child, Curve curve = Curves.linear, required Duration duration, }) : super( key: key, curve: curve, duration: duration, ); final BoxDecoration decoration; final Widget child; _AnimatedDecoratedBoxState createState() { return _AnimatedDecoratedBoxState(); } }1
2
3
4
5
6
7
8
9
10
11
12
13
14
15
16
17
18
19
20其中
curve、duration、reverseDuration三个属性在ImplicitlyAnimatedWidget中已定义。 可以看到AnimatedDecoratedBox类和普通继承自StatefulWidget的类没有什么不同。State类继承自
AnimatedWidgetBaseState(该类继承自ImplicitlyAnimatedWidgetState类)。class _AnimatedDecoratedBoxState extends AnimatedWidgetBaseState<AnimatedDecoratedBox> { late DecorationTween _decoration; Widget build(BuildContext context) { return DecoratedBox( decoration: _decoration.evaluate(animation), child: widget.child, ); } void forEachTween(TweenVisitor<dynamic> visitor) { _decoration = visitor( _decoration, widget.decoration, (value) => DecorationTween(begin: value), ) as DecorationTween; } }1
2
3
4
5
6
7
8
9
10
11
12
13
14
15
16
17
18
19
20
21可以看到我们实现了
build和forEachTween两个方法。在动画执行过程中,每一帧都会调用build方法(调用逻辑在ImplicitlyAnimatedWidgetState中),所以在build方法中我们需要构建每一帧的DecoratedBox状态,因此得算出每一帧的decoration状态,这个我们可以通过_decoration.evaluate(animation)来算出,其中animation是ImplicitlyAnimatedWidgetState基类中定义的对象,_decoration是我们自定义的一个DecorationTween类型的对象,那么现在的问题就是它是在什么时候被赋值的呢?要回答这个问题,我们就得搞清楚什么时候需要对_decoration赋值。我们知道_decoration是一个Tween,而Tween的主要职责就是定义动画的起始状态(begin)和终止状态(end)。对于AnimatedDecoratedBox来说,decoration的终止状态就是用户传给它的值,而起始状态是不确定的,有以下两种情况:AnimatedDecoratedBox首次build,此时直接将其decoration值置为起始状态,即_decoration值为DecorationTween(begin: decoration)。AnimatedDecoratedBox的decoration更新时,则起始状态为_decoration.animate(animation),即_decoration值为DecorationTween(begin: _decoration.animate(animation),end:decoration)。
现在forEachTween的作用就很明显了,它正是用于来更新Tween的初始值的,在上述两种情况下会被调用,而开发者只需重写此方法,并在此方法中更新Tween的起始状态值即可。而一些更新的逻辑被屏蔽在了visitor回调,我们只需要调用它并给它传递正确的参数即可,visitor方法签名如下:
 Tween<T> visitor(
   Tween<T> tween, //当前的tween,第一次调用为null
   T targetValue, // 终止状态
   TweenConstructor<T> constructor,//Tween构造器,在上述三种情况下会被调用以更新tween
 );
2
3
4
5
可以看到,通过继承ImplicitlyAnimatedWidget和ImplicitlyAnimatedWidgetState类可以快速的实现动画过渡组件的封装,这和我们纯手工实现相比,代码简化了很多。
如果读者还有疑惑,建议查看
ImplicitlyAnimatedWidgetState的源码并结合本示例代码对比理解。
# 9.7.2 Flutter预置的动画过渡组件
Flutter SDK中也预置了很多动画过渡组件,实现方式和大都和AnimatedDecoratedBox差不多,如表9-1所示:
| 组件名 | 功能 |
|---|---|
| AnimatedPadding | 在padding发生变化时会执行过渡动画到新状态 |
| AnimatedPositioned | 配合Stack一起使用,当定位状态发生变化时会执行过渡动画到新的状态。 |
| AnimatedOpacity | 在透明度opacity发生变化时执行过渡动画到新状态 |
| AnimatedAlign | 当alignment发生变化时会执行过渡动画到新的状态。 |
| AnimatedContainer | 当Container属性发生变化时会执行过渡动画到新的状态。 |
| AnimatedDefaultTextStyle | 当字体样式发生变化时,子组件中继承了该样式的文本组件会动态过渡到新样式。 |
import 'package:flutter/material.dart';
class AnimatedWidgetsTest extends StatefulWidget {
const AnimatedWidgetsTest({Key? key}) : super(key: key);
_AnimatedWidgetsTestState createState() => _AnimatedWidgetsTestState();
}
class _AnimatedWidgetsTestState extends State<AnimatedWidgetsTest> {
double _padding = 10;
var _align = Alignment.topRight;
double _height = 100;
double _left = 0;
Color _color = Colors.red;
TextStyle _style = const TextStyle(color: Colors.black);
Color _decorationColor = Colors.blue;
double _opacity = 1;
Widget build(BuildContext context) {
var duration = const Duration(milliseconds: 400);
return SingleChildScrollView(
child: Column(
children: <Widget>[
ElevatedButton(
onPressed: () {
setState(() {
_padding = 20;
});
},
child: AnimatedPadding(
duration: duration,
padding: EdgeInsets.all(_padding),
child: const Text("AnimatedPadding"),
),
),
SizedBox(
height: 50,
child: Stack(
children: <Widget>[
AnimatedPositioned(
duration: duration,
left: _left,
child: ElevatedButton(
onPressed: () {
setState(() {
_left = 100;
});
},
child: const Text("AnimatedPositioned"),
),
)
],
),
),
Container(
height: 100,
color: Colors.grey,
child: AnimatedAlign(
duration: duration,
alignment: _align,
child: ElevatedButton(
onPressed: () {
setState(() {
_align = Alignment.center;
});
},
child: const Text("AnimatedAlign"),
),
),
),
AnimatedContainer(
duration: duration,
height: _height,
color: _color,
child: TextButton(
onPressed: () {
setState(() {
_height = 150;
_color = Colors.blue;
});
},
child: const Text(
"AnimatedContainer",
style: TextStyle(color: Colors.white),
),
),
),
AnimatedDefaultTextStyle(
child: GestureDetector(
child: const Text("hello world"),
onTap: () {
setState(() {
_style = const TextStyle(
color: Colors.blue,
decorationStyle: TextDecorationStyle.solid,
decorationColor: Colors.blue,
);
});
},
),
style: _style,
duration: duration,
),
AnimatedOpacity(
opacity: _opacity,
duration: duration,
child: TextButton(
style: ButtonStyle(
backgroundColor: MaterialStateProperty.all(Colors.blue)),
onPressed: () {
setState(() {
_opacity = 0.2;
});
},
child: const Text(
"AnimatedOpacity",
style: TextStyle(color: Colors.white),
),
),
),
AnimatedDecoratedBox1(
duration: Duration(
milliseconds: _decorationColor == Colors.red ? 400 : 2000),
decoration: BoxDecoration(color: _decorationColor),
child: Builder(builder: (context) {
return TextButton(
onPressed: () {
setState(() {
_decorationColor = _decorationColor == Colors.blue
? Colors.red
: Colors.blue;
});
},
child: const Text(
"AnimatedDecoratedBox toggle",
style: TextStyle(color: Colors.white),
),
);
}),
)
].map((e) {
return Padding(
padding: const EdgeInsets.symmetric(vertical: 16),
child: e,
);
}).toList(),
),
);
}
}
2
3
4
5
6
7
8
9
10
11
12
13
14
15
16
17
18
19
20
21
22
23
24
25
26
27
28
29
30
31
32
33
34
35
36
37
38
39
40
41
42
43
44
45
46
47
48
49
50
51
52
53
54
55
56
57
58
59
60
61
62
63
64
65
66
67
68
69
70
71
72
73
74
75
76
77
78
79
80
81
82
83
84
85
86
87
88
89
90
91
92
93
94
95
96
97
98
99
100
101
102
103
104
105
106
107
108
109
110
111
112
113
114
115
116
117
118
119
120
121
122
123
124
125
126
127
128
129
130
131
132
133
134
135
136
137
138
139
140
141
142
143
144
145
146
147
148
149
150
151
152
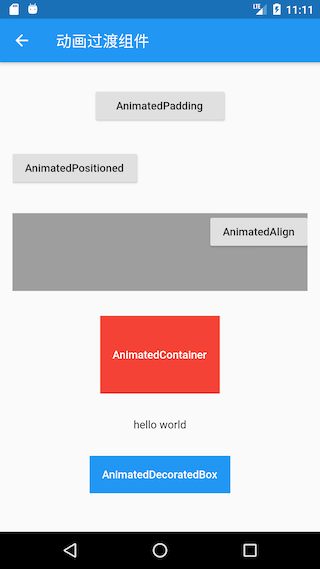
运行后效果如图9-9所示:
读者可以点击一下相应组件来查看一下实际的运行效果。